Showing posts with label bangs. Show all posts

Thursday, December 6, 2012

HAIR TALK: SQUARE FACE SHAPE


post + graphic design: Kristin Ess


Last week we put up a chart that shows you HOW TO FIND YOUR FACE SHAPE. Hopefully you’ve all narrowed it down to one shape (or two if you’re a hybrid!) and are ready to talk about what cuts + styles work best for you. Don’t fret- we’re going to do a post on each of the 9 face shapes from our chart, so hang tight if you don’t see yours yet! It’s coming. Also, feel free to mix advice from two face shape posts if you think you’re a hybrid! Talk it over with your hairstylist if you’re not quite sure.


THE SQUARE: The goal with most face shapes we’ll talk about will be to either love it/embrace it/wear it proud like Olivia Wilde does in the bigger picture above with all of her hair pulled off of her face OR to do what you can to down-play your shape if it’s something that you don’t love. If you’re looking to down-play your square face shape, the goal will be to diffuse the 4 corners a little bit. Here are some great ways to do that.


  • SIDE SWEPT BANG- A soft, side swept bang that curves around (see bottom left photo) draws your attention more to the eyes instead of the corners of the jawline. That beautiful eye makeup doesn’t hurt either!
  • LOOSE NATURAL WAVES- With waves, you can create curves in all the right places. You can see how the hair curves in and diffuses the corners of Olivia’s jawline ever-so-slightly (see bottom left photo).
  • SLIGHTLY ANGLED LONG BOB (LOB)- The weight on a slightly angled bob is a tiny bit heavier up front near the face. That weight will keep the hair laying closer to your face and will also help down-play squareness.
  • CENTER PART- A center part will conceal the upper corners of your square shape. I love Olivia’s chignon here (see bottom center photo). The soft pieces that fall out in front lay lightly along the sides of her jawline which soften the square visually.
  • CHOPPY BANGS- I don’t usually recommend heavy blunt bangs for someone with a square face shape because it can make your jaw appear even more square, however if you want a heavier bang make them choppy and rounded on the sides (see bottom right photo).
  • PONYTAIL- This is the best way to wear a ponytail with a square face shape, in my opinion. The messy texture and loose, soft pieces in front allow you to play up the fact that you have a great jawline (consider yourself lucky because some of us don’t!) but the ponytail doesn’t look severe. It’s soft and feminine and works well with the harder lines of a square shape.
  • TOP KNOT- If you want to wear a top knot either just go for it and let that jawline shine or try pairing it with a “Bardot Bang” (which you can find it right HERE) to soften it up.
  • HAIRCUTS- No matter the length I always vote layers + waves, layers + waves, layers + waves! You can’t go wrong with pairing layers + waves with a square face shape because no matter how long or short, it softens the lines. If you have straight hair and a square face shape, ask your hairstylist to show you how to create some waves that flatter your face! If you have wavy or curly hair, lucky you.

Do you have a square face shape and a favorite way to wear your hair? Share it below. We love seeing our girls sharing info about what works and the experiences you’ve had! xo


Tuesday, August 21, 2012

ADDING LENGTH TO SHORT HAIR


tutorial by Micha Brown, photos + graphic design: Kristin Ess


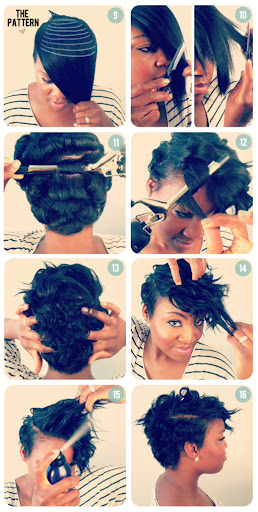
When it comes to super short hair, you often find yourself to be slightly limited with styling options. That’s why we thought it would be great to show you how to temporarily add a little length using extension wefts. This gives you a bit more versatility with your look. We’re pretty obsessed with Meagan Good’s short + sassy style. It’s really short in the back and gets longer toward the front. We’ve seen short hair on both Rihanna + Pink for years, but there’s something less edgy about this– it’s a very feminine, chic, flirty hairstyle. We’re so excited to show you how to play with length. Here we go!


  1. Start by blowing your hair into the desired shape if your hair is not relaxed. If your hair is relaxed, start by shaping it with setting lotion + setting strips. After the hair is completely dry, remove the setting strips.
  2. Use our FAVORITE TOOL for smoothing crazy curly roots! It’s called the “Root Control” tool, and if you haven’t heard of it, you should check it out! It’s just amazing. It’s like a hot comb for the root. Best. Thing. Ever.
  3. Create a clean part using a tail comb about 1″ behind your hair line. The part should mimic the hair line. (If you need visual help, jump down and peek at step #9!)
  4. Now get out your extension track. You don’t want to use clip-in extensions for this, you want to use THESE EXTENSIONS which are considered tracks/wefts. Measure the extension track like you see Micha doing in photo #4 and cut the piece to be the exact same length as the part.
  5. Apply a temporary bonding glue to the sewn part of the extension. If you’re confused on which bonding glue to get, ask the person you buy the extensions from. We like the Natty’s glue the best. Temporary extension glue lasts about 3-7 days depending on how fast your scalp gets oily. TIP: people have expressed that they’ve had a bad experience removing extension glue. I can assure you NOTHING removes this temporary extension bonding glue better than THIS. Spray it on, wait 3 minutes and peel the extension off with no problems. I’ve used it for years on many-a-model and have never had one problem. Most people try to soak them off with water. That doesn’t work!
  6. Lay the glue side down on your scalp and use the blowdryer on cool to set it. It takes about 20-30 seconds to adhere when using the blowdryer.
  7. Keep going!
  8. Keep going!
  9. You should lay 7-10 tracks down, one right behind the other (approx 1/2″ apart. Make your sections a teeny bit less wide as you move up toward the crown. (Use photo 9 as a guide if you need help!) Once you have all your tracks laid down, you’re ready for the fun part!
  10. We like to use this hair cutting razor to get a more textured haircut, but you can also use scissors or thinning shears if you know what you’re doing. If you look at Micha in photo #10 you see that she picks up little pieces at a time and slides the razor down. She’s also not going anywhere near her own hair. Please BE CAREFUL NOT TO CUT YOUR OWN HAIR. If you don’t feel comfortable doing this part, don’t do it and ask someone who does. The whole point of this tutorial is to add length so you shouldn’t be cutting too close to your own hair anyway. Stay at least an inch away and you’ll have no worries.
  11. Once you’ve cut into the top, it’s time to add some texture to the back. Use a little curling iron for the best result. We used THIS ONE.
  12. Now add some curl to the front. Leave the ends out when you curl like Micha does in photo #12. Use a slightly larger size curling iron for this part. We used THIS ONE.
  13. Use a little more of your pomade for texture. Now you can rub it into the roots as well.
  14. Same thing for the front. Rub a little pomade into your hands and then through the front.
  15. Add shine or texture spray as desired. Here we’re using that beach spray we’ve been obsessed with. It gives beach-y texture but maintains the shine unlike some other beach sprays.
  16. Last but not least, always check the back using a hand mirror and make sure the shape is right.


Seriously makes me want to chop my hair off! And how gorgeous does Micha look with short hair!? If you have short hair + add some extensions for length, please remember to tweet us a photo @TBDOFFICIAL. We would love to see yours!!