
DIY: How to turn two silk scarves into a fabulous fall dress. Photo: Park & Cube
Showing posts with label DIY. Show all posts
Showing posts with label DIY. Show all posts
Monday, September 15, 2014

Thursday, November 15, 2012
EDGE PERFECTION

post + photos by amy nadine, graphic design by eunice chun
Another oldie but goodie, this trick is your best friend for many reasons… it creates a sharp line, it has a lifting effect and it takes the pressure off you to even worry about applying it perfectly. And all you need is a baby wipe. Sold! Here’s how:
- Before you apply foundation, start with a smoky eye. Hold the wipe from the side of your nose to the end of the brow. 99% of the time, this is the perfect angle for lifting and winging your shadow. If your eyebrow is on the shorter side, use the angle of the outside corner of your lower lashline to determine where you place the wipe.
- Place your finger on the wipe directly to the side of the eyeshadow as seen above.
- In one quick swoop, pull the wipe by dragging your finger from your bottom lashline to your brow.
- Remove the wipe and you’ll see a perfect + clean edge!
- Perfect the top corner by slightly rounding it out with a Q-tip.
You can end it there. Or… for even more drama, go back with a black kajal liner like the Physician’s Formula Shimmer Liner that I used on Sophia above (or a black liquid liner) and draw an exaggerated winged line using the edge as your guide.
Wednesday, November 14, 2012
Get your DIY fix (16 photos)
- 1
- Burlap Utensil Holder - Click HERE for the steps -

- 2
- Wine Bottle Torch - Click HERE for the steps -

- 3

- 4
- DIY Bow Clutch - Click HERE for the steps -

- 5
- White Jersey Necklace - Click HERE for the steps -

- 6

- 7
- 3 Strap Bra DIY - Click HERE for the steps -

- 8
- Braided Rug - Click HERE for the steps -

- 9
- 10
- Pet Coat - Click HERE for the steps -

- 11

- 12
- Cute Gift Trug - Click HERE for the steps -

- 13
- Leftover Halloween Candy Bark & Cookies- Click HERE for the steps -

- 14

- 15
- Mason Jar To-Go Cup- Click HERE for the steps -

- 16

Wednesday, November 7, 2012
TRY A LITTLE HELP FROM A FRIEND

post + photos by amy nadine, graphic design by eunice chun
We still get many emails about brows, which is why we’re back to brows again today! If you’ve missed our Brow Stencil and Brows 101 photo tutorials, revisit them here and here respectively. If you still need a little help, maybe this new one will give you your a-ha moment! Sometimes you just need to grab an object with a straight side, like a comb, a skinny long brush or a ruler and use it to guide you by outlining the perimeter. Here’s how:
TOOLS:
- A straight edge (I used the pick side of a comb)
- A brow liner pencil — I am obsessed with Tarte’s EmphasEYES Brow Liner because it’s a thin hard pencil that is waterproof and won’t smudge.
- A brow powder (I used Laura Mercier Cake Liner in Brown because I love the color payoff and it’s always nice to have a 2-for-1 product)
- Stiff-angled brow brush — I love Damone Roberts’ Brow Brush because I use the spooly on the other end as well.
- Brow Gel — I used Anastasia Clear Brow Gel and have for years.
STEPS:
- Place the straight edge along the underside of the brow, from the end to the arch, and trace a line with the brow liner.
- Place the straight edge along the top of the brow, from the end to the arch again, and trace a line with the brow liner.
- Place the straight edge along the top of the brow, from the arch to the beginning of the brow (by your nose), and trace a line with the liner.
- Place the straight edge along the bottom of the brow, from the bottom of the arch to the beginning of the brow, and trace a line connecting it to the one from step 1. Steps 1-4 basically drew an outline of the perimeter your brow.
- Dip your brow brush into the shadow powder and start drawing individual hairs, mimicking your own, by flicking the brush upwards in little strokes. This technique is more tedious than merely shading it in but looks much more realistic.
- Continue drawing hairs all the way to the arch.
- Fill in the arch with more curved motions, determined by the direction of the hair growth.
- Switch to downward strokes from the arch to the end.
- With the brow get, brush hairs upwards if you’re like me and like a more natural look. If not, brush them from the nose towards the arch to lock them in place.
Monday, November 5, 2012
WHICH BRUSH DOES WHAT: CHEEKS

post + photos by amy nadine, graphic design by eunice chun
This is the last in our Which Brush Does What Series (if you missed them, revisit eye brushes here and face brushes here) and today’s walks you through the world of blush, highlighting and bronzing brushes. Here we go!
- Cheekbones (powder blush): Look for natural hair bristles and an angled tip to perfectly sculpt and shape cheekbones. To find where yours are, look in the mirror and suck in your cheeks, then work the brush directly on them using short
strokes as you make your way across towards your ears. Try this one from the Sephora Collection. - Apples (powder blush): Look for natural bristles and a plump body with a pointed tip for the best precision when applying blush to the apples of your cheeks. To find where yours are, look in the mirror and smile; your apples will literally pop out like little golf balls. Swirl the blush in circular motions directly on top of them. This NARS Yachiyo Brush #27 is a bit of investment but you’ll have it for years.
- Stippling cream blush): Look for synthetic + natural bristles in two layers that are different colors, a dark set that is dense and short (natural) and a lighter set that is long and sparse (synthetic). This design picks up two layers when you gently dip it in your cream blush, allowing for different outcomes when swirling it from the apples across your cheekbones (light pressure = sheer finish, heavier pressure = satin finish). Then blend edges with your fingers. Try this lovely Chanel Blending Foundation Brush or this more affordable Japonesque Stippling Brush.
- Contouring (cream or powder bronzer): Look for synthetic bristles if you are using a cream bronzer (or a cream foundation three shades darker than your skin tone); look for natural bristles if you are using a bronzing powder. Using short strokes, trace the product directly under your cheekbone in the hollows of your cheeks, up to your temples, across your hairline and under your jawline. For a refresher course on contouring, click here to see our Contouring Tutorial in six steps. This Stila Contour Brush is a staple in my kit.
- Highlighting (loose or pressed highlighting powder): Look for natural or both natural + synthetic bristles in a fan shape that feel light and airy on your skin. This design is perfect for sweeping a shimmery highlighting powder directly above your cheekbones using light, downward strokes. It’s also great for those of you who aren’t blush people, but don’t mind a hint of a flush, use this brush to lightly sweep a nude blush on your cheekbones. Bonus: fan brushes were originally developed to "dust" away excess powder or shadow particles, so next time you create a smoky eye and there are little black shadow droppings that have fallen on your cheeks, use your fan brush like a duster to sweep them away. Try Tarte’s Fanatic Fanned Brush.
- Bronzing (loose or pressed powder bronzer): Look for natural bristles with a rounded head for the most even application. Unlike using bronzer for contouring, here we're using it to look sunkissed, so this brush design is ideal to evenly distribute, diffuse and blend the powder as you swirl it all over your face and neck. This Tarte The Buffer Airbrush Finish Brush works amazingly for bronzing and also for blending (see next step).
- Blending (everything!): This Dior Backstage Kabuki Brush is a must-have splurge for serious make-up artists. It has short and dense natural bristles that is the ultimate blender to swirl all over following blush, bronzer or powder application. Bonus trick: if you use a foundation or bronzer that comes as a spray, instead of applying it directly to your face, spray it in the palm of your hand, dip the kabuki brush in it then swirl it all over your face and neck for an airbrushed look that is simply gorgeous. This Eco Tools Kabuki Brush is also great and more budget-friendly.
You certainly don’t need to own all seven of them. If I had to only pick three must-haves for myself, I would have #1, 4 + 7!
Thursday, October 25, 2012
Just a few beauty tips (6 photos)


Thursday, October 11, 2012
WHY NOT?

post + photos by amy nadine, graphic design by eunice chun
This might not be for everyone but I know it made a lot of you light up inside! There are so many different variations of this too. You can make every other color rotate between metallic and matte finishes, you can repeat colors, you can do only two or three colors instead of all six… just let this be an inspiration to have some fun with your lids every now and then. Your friends will appreciate it! Here’s how:
TOOLS:
- I used these Lime Crime matte liquid liners on Carissa above.
- You could also try these gorgeous metallic versions here and here.
STEPS:
- Determine which color to start with. I like a darker color on the lashline because it also defines your eyes, but the white shade at the lashline is fun too.
- Then one after the other, start at your inner corner and slowly trace the lashline to the outer corner.
- Go back over lines to try and make them even and smooth. Each time I added a new line, I had to go back to the line directly below it and add a coat.
- Determine how much eye space you have left to decide how many colors you can showcase. We had to stop at 6 because we were already at the crease.
- Wet a pointed Q-tip with water and erase any markings outside of the top line or line endings.
- Add mascara and enjoy!
Tuesday, August 21, 2012
ADDING LENGTH TO SHORT HAIR

tutorial by Micha Brown, photos + graphic design: Kristin Ess
When it comes to super short hair, you often find yourself to be slightly limited with styling options. That’s why we thought it would be great to show you how to temporarily add a little length using extension wefts. This gives you a bit more versatility with your look. We’re pretty obsessed with Meagan Good’s short + sassy style. It’s really short in the back and gets longer toward the front. We’ve seen short hair on both Rihanna + Pink for years, but there’s something less edgy about this– it’s a very feminine, chic, flirty hairstyle. We’re so excited to show you how to play with length. Here we go!

- Start by blowing your hair into the desired shape if your hair is not relaxed. If your hair is relaxed, start by shaping it with setting lotion + setting strips. After the hair is completely dry, remove the setting strips.
- Use our FAVORITE TOOL for smoothing crazy curly roots! It’s called the “Root Control” tool, and if you haven’t heard of it, you should check it out! It’s just amazing. It’s like a hot comb for the root. Best. Thing. Ever.
- Create a clean part using a tail comb about 1″ behind your hair line. The part should mimic the hair line. (If you need visual help, jump down and peek at step #9!)
- Now get out your extension track. You don’t want to use clip-in extensions for this, you want to use THESE EXTENSIONS which are considered tracks/wefts. Measure the extension track like you see Micha doing in photo #4 and cut the piece to be the exact same length as the part.
- Apply a temporary bonding glue to the sewn part of the extension. If you’re confused on which bonding glue to get, ask the person you buy the extensions from. We like the Natty’s glue the best. Temporary extension glue lasts about 3-7 days depending on how fast your scalp gets oily. TIP: people have expressed that they’ve had a bad experience removing extension glue. I can assure you NOTHING removes this temporary extension bonding glue better than THIS. Spray it on, wait 3 minutes and peel the extension off with no problems. I’ve used it for years on many-a-model and have never had one problem. Most people try to soak them off with water. That doesn’t work!
- Lay the glue side down on your scalp and use the blowdryer on cool to set it. It takes about 20-30 seconds to adhere when using the blowdryer.
- Keep going!
- Keep going!
- You should lay 7-10 tracks down, one right behind the other (approx 1/2″ apart. Make your sections a teeny bit less wide as you move up toward the crown. (Use photo 9 as a guide if you need help!) Once you have all your tracks laid down, you’re ready for the fun part!
- We like to use this hair cutting razor to get a more textured haircut, but you can also use scissors or thinning shears if you know what you’re doing. If you look at Micha in photo #10 you see that she picks up little pieces at a time and slides the razor down. She’s also not going anywhere near her own hair. Please BE CAREFUL NOT TO CUT YOUR OWN HAIR. If you don’t feel comfortable doing this part, don’t do it and ask someone who does. The whole point of this tutorial is to add length so you shouldn’t be cutting too close to your own hair anyway. Stay at least an inch away and you’ll have no worries.
- Once you’ve cut into the top, it’s time to add some texture to the back. Use a little curling iron for the best result. We used THIS ONE.
- Now add some curl to the front. Leave the ends out when you curl like Micha does in photo #12. Use a slightly larger size curling iron for this part. We used THIS ONE.
- Use a little more of your pomade for texture. Now you can rub it into the roots as well.
- Same thing for the front. Rub a little pomade into your hands and then through the front.
- Add shine or texture spray as desired. Here we’re using that beach spray we’ve been obsessed with. It gives beach-y texture but maintains the shine unlike some other beach sprays.
- Last but not least, always check the back using a hand mirror and make sure the shape is right.
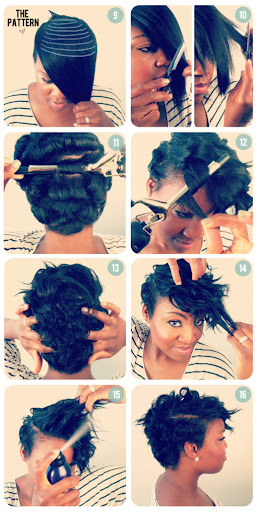
Seriously makes me want to chop my hair off! And how gorgeous does Micha look with short hair!? If you have short hair + add some extensions for length, please remember to tweet us a photo @TBDOFFICIAL. We would love to see yours!!
Subscribe to:
Posts (Atom)